How To Configure Netgear Router For Fast and Secure Home WiFi?
Nowadays, having a reliable wifi network starts with the proper router setup. If you are a new Netgear router owner or planning to buy one, then you must know How To Configure Netgear Router easily. Netgear offers a wide range of networking devices from wifi routers to range extenders, offering reliable and strong wifi connectivity across your spaces. So, get ready to elevate your internet experience with the Netgear routers with us. So, walk through this Netgear configuration process step-by-step through our guide. Let’s read further!
Requirements For the Netgear WiFi Router Configuration
To begin with, your Netgear router setup ensures that you have stable, fast, and secure internet access. In addition, it is important to know the default web/IP address, correct login details, a Netgear Nighthawk app, etc.
On the other hand, you may also need the Ethernet cables, a compatible power adapter, power cords, etc. Once you have all these things with you, head over to the Netgear WiFi Router Configuration process straight away.
How to Configure Netgear Router in Simple Steps?
After collecting the essential items to perform this process, it is vital to find a suitable method to configure your device seamlessly. Generally, you can configure the Netgear wifi router via its web interface and using the Netgear Nighthawk mobile app. But the web GUI is the most preferred way of setting up this gateway. So, let us learn How To Configure Netgear Router via a web browser.
- First, unbox your Netgear wifi router and ensure you have everything.
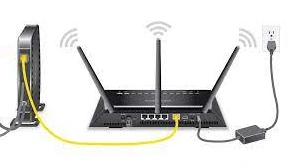
- Now, plug your wifi router into a power socket and power on your device.
- Then, connect your wifi router to the internet modem via an Ethernet cable.
- Next, power on both the modem and the router.
- After that, connect your computer or laptop to the router’s network.
- You can either opt for the Ethernet connections or use the default SSID & password.
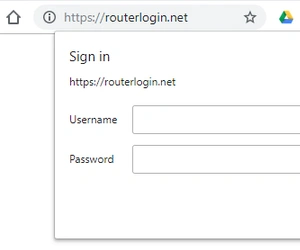
- Now, access Netgear’s web management page via the routerlogin.net web address.
- Hereon, a login window appears to you, enter your default login details.
- Then, you will visit the setup wizard of the Netgear router.
- After that, visit the Basic>Wireless tab, and the Wireless Setup page opens.
- Hereon, customize your wifi settings as per your preferences and apply the changes.
- Then, go to the Advanced tab and tap Setup to configure WAN, LAN, etc.
- Further, navigate to the Security to enable Parental Controls, Block Sites, and Access Control, etc.
- At last, save all the changes to end this configuration.
In the End
In conclusion, learning How To Configure Netgear Router is crucial for establishing a reliable and secure home wifi network. From the unboxing to initial setup to configuring the advanced settings, this guide explains all to you concisely. Moreover, with the right configuration and proper process, you can elevate your online experience at your fingertips.