How to Install OpenVPN on Netgear Router?
Generally, VPN stands for Virtual Private Network. This feature allows secure access to a protected network. Additionally, TP-link networking devices are also equipped with this functionality, all you need is to install the VPN on your router. So, if you want to know how to install OpenVPN on Netgear router, stay in touch with this page. Here, you find detailed information from installation to setup of the VPN on your Netgear router, so keep reading!
Steps to Install VPN on Netgear Router
Initially, you want to use the VPN on your Netgear networking device, then must install it on your router. Here, we share the detailed steps for installing the VPN, take a look:
- To begin with, ensure your router is powered on.
- Now, connect the Windows/Android smartphone to the Netgear router’s network.
- After that, visit the official site and download the Open VPN Client utility.
- Next, click on the OpenVPN-install-xxx.exe file and then tap on Next.
- For the Windows Installer section of the page, double-click the OpenVPN-install-xxx.exe link.
- Further, read the License & Agreement terms and tap on “I Agree.”
- Again, click on Next and select the location on your computer to install the file.
- Now, tap on Browse>Choose the folder for the file>Install>Finish.
- At last, the file is stored in the specific folder and you understand well how to install OpenVPN on Netgear router procedure.
What are the Quick Steps For Netgear VPN Setup?
Additionally, when the installation gets complete on your computer or smartphone, then it is time to perform Netgear Router VPN Configuration. To begin with the setup procedure, you must be ready with a stable network, valid admin details, web address, computer/smartphone, etc. Here, we share the detailed steps for setting up the Virtual Private Network on your router using your computer/smartphone, so have a glance once:
- Primarily, link the Windows/mobile phone to the Netgear router’s network.
- After that, open the web browser and key in the routerlogin.net web address in the browser bar.
- Further, mention the valid admin details on the login window and access the web interface.
- Next, you reach the Home dashboard of the router and here go to the Settings panel.
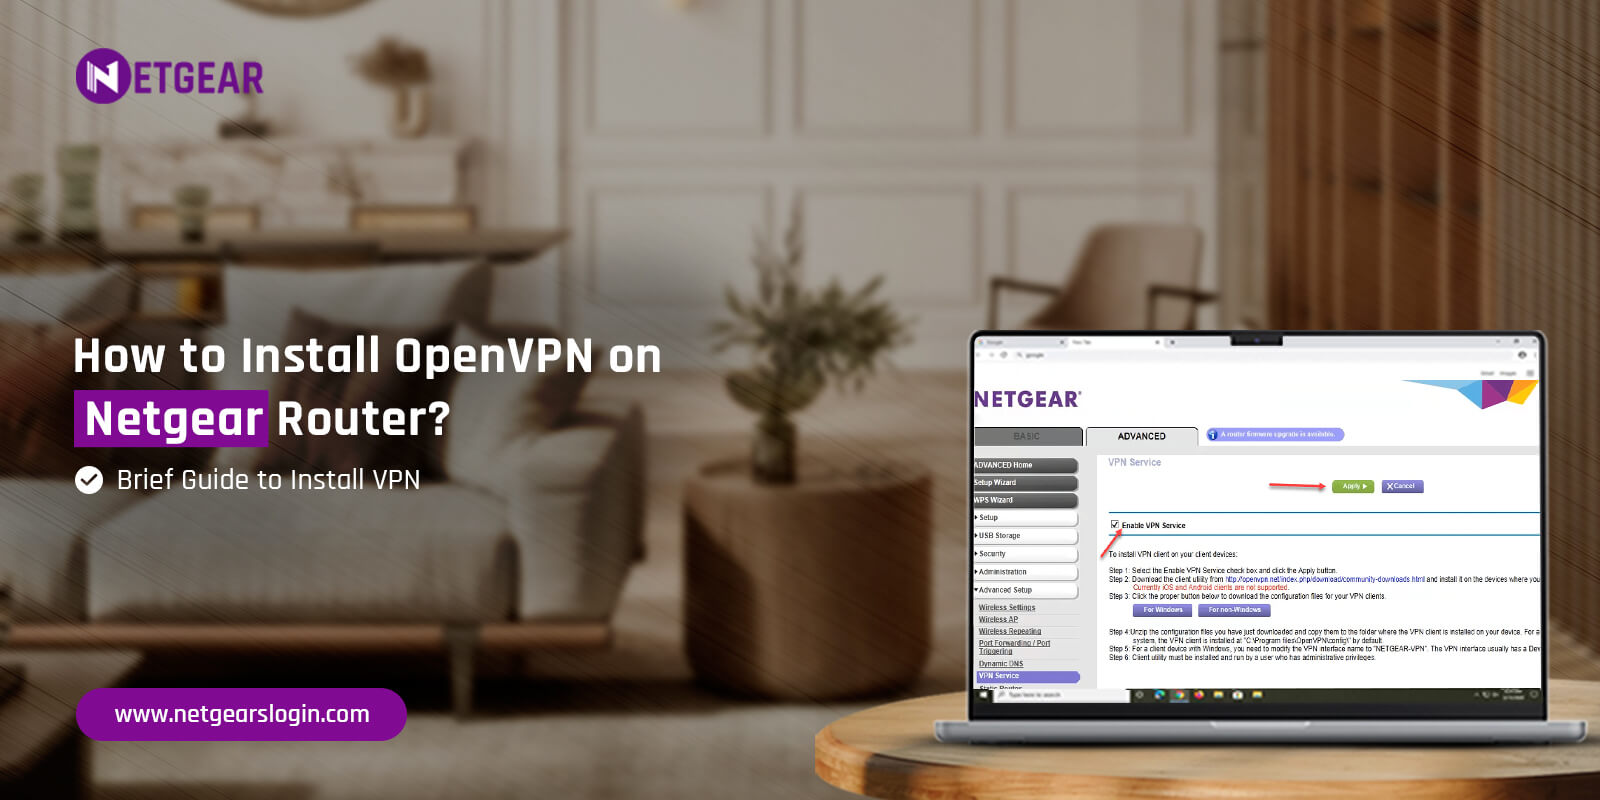
- Now, visit Advanced>Advanced Setup>VPN Service, and the VPN page displays to you.
- Hereon, mark the Enable VPN Service check box and tap on Apply.
- Afterward, you need to choose the For Windows option to download the OpenVPN Configuration file.
- When done with the install VPN on Netgear router process, then unzip the VPN file you recently downloaded.
- Now, copy this file and paste where the VPN client is installed on your computer.
- Additionally, if you use a client device Windows then it is mandatory to change the VPN interface name, i.e. Netgear VPN.
- To do so, visit the Network Page on the computer and follow the on-screen guidelines to complete the process.
- Lastly, the Netgear Router VPN Configuration procedure ends here.
Pro Tip: Remember if you do not modify the name of the VPN interface, then the VPN tunnel connection fails.
Setup VPN on Netgear Router Using Android Phone
- First and foremost, join the Netgear router network using your computer/laptop.
- You can directly connect to the wireless network otherwise, use an ethernet cable to join this internet.
- Further, launch the preferred web browser on the computer and mention routerlogin.net web or 192.168.1.1 IP address in the browser bar.
- Now, a login window appears to you, key in the valid username and password here to access the admin panel of the router.
- Next, you land on the smart wizard of the networking device.
- Here, click on Advanced>Advanced Setup>VPN Service and choose Enable VPN Service and, then tap on Apply.
- Afterward, click on For Smartphone to download the OpenVPN Configuration package.
- Remember, the TUN/TAP port numbers are different when using a computer & smartphone for Netgear Nighthawk VPN setup (Openvpn only).
- Hereon, follow the guidelines to download the OpenVPN file for your mobile phone or PC.
- The VPN file link is sent to you via email on your smartphone, so check the mailbox before extracting it.
- When the installation ends, extract the smartphone.zip file, and four different files are presented to you.
Connect Your Smartphone to the Windows
- After that, connect your smartphone to Windows as a client device using a USB cable.
- Next, open the phone storage and create a new folder to save the unzipped 4 VPN files.
- Now, copy from the Windows recently installed and unzipped OpenVPN files (4 files) and paste them to the newly created folder on your mobile device.
- Also, you can share these 4 OpenVPN Config files via email where you can download and save them directly to your phone storage.
- Afterward, disconnect your mobile device from the Windows and link it to another internet connection.
- Now, launch the Open VPN on your Android phone and import the “client3.ovpn” file.
- Here, click on Connect and wait till the connection becomes active.
- At last, the Netgear VPN Setup procedure finishes now.
Pro Tip: If you only extracted and downloaded the “client3.ovpn” file, then you can import the “smart_phone.ovpn” file.
How to Install OpenVPN on Netgear Router Using the Mac OS Computer?
Furthermore, the procedure of installing and configuring the Open VPN on a Mac OS computer is quite simple. All you need is a stable internet connection, computer Mac OS, user details, adequate power supply, etc. So if you seek assistance with the setup VPN on Netgear router using your MAC OS device, then follow the steps mentioned below:
- Initially, link your MAC OS computer to the Netgear router’s network directly or use a network cable.
- After that, open the web browser and key in the routerlogin.net web address in the browser bar.
- Next, enter the valid username and password on the login window that prompts you.
- After logging in, the Netgear Genie dashboard is shown to you.
- Now, click on Advanced>Advanced Setup>VPN Service.
- Here, select Enable VPN Service and then click on Apply.
- Remember if you need to alter the Service Type/Service Port, then change them before clicking Apply.
- Further, click on For Non-Windows and download the OpenVPN Configuration.
Download Tunnelblick VPN Client Software
- Now, click on Tunnelblick VPN Client on your Mac OS computer.
- If you do not have the Tunnelblick VPN Client software on your Mac OS device, then download it from the official site, first.
- After opening the Tunnelblick VPN Client on your smart Mac OS, click on “I have Configuration Files” and then tap on OK.
- Afterward, create a new folder on your MAC OS system to store the downloaded file.
- Here, open the Netgear Nighthawk VPN setup files on your router that you recently downloaded and now transfer the files to the newly created folder on your Mac system.
- Again, you need to rename the file and add “.tblk” at the end.
- Next, open the folder, install the Configuration file on the smart Mac OS, and choose All Users or Only Me.
- If needed, then enter the Computer password and click on OK.
- After that, click on the Tunnelblick icon at the top of the screen and tap on Connect.
- Now, wait till the VPN connects, and keep in mind that TUN/TAP port numbers are not the same when you use the system and smartphone together.
- Finally, you can access the Open VPN on your smart device using the VPN Tunnel through Tunnelblick software.
If you still want to know more, then drop us a line here!